
Developed by iPhone Dev Team, Redsn0w is a replacement of QuickPwn to jailbreak iPhone 3.0. The jailbreak process is very straightforward that any iPhone owner can manage the jailbreak. Visit at iPhone Dev Team Blog for more information about Redsn0w.
- RedSn0W only suitable for the recent iPhone OS 3.0 firmware updated.
- This jailbreak guide is designed for Windows user only. For Mac user, you can use PwnageTool 3.0 to jailbreak.
- Redsn0w is work for Original iPhone (1st Generation), Original iPod touch, iPod touch 2G and the iPhone 3G (not the iPhone 3GS).
- This guide is suitable to jailbreak & unlock iPhone 2G (the 1st generation iPhone).
- If you’re using lower version of firmware (e.g. 1.1, 2.0, 2.1 or 2.2), you can also follow these jailbreak procedures to upgrade the firmware to 3.0. But please bear in mind, that you’ll have to re-install all the Cydia applications after upgrade. And, at the time I write this post, not all Cydia applications (e.g. AptBackup, iBluetooth, Backgrounder, iRealSMS, MySMS, BossTool, Quickgold) are compatible with iPhone 3.0. So, if you have any cydia applications that you rely on, please ensure its compatibility before upgrading.
Step 1: Make sure you have upgraded to iTunes version 8.2 and backup your iPhone data by synchronizing it with iTunes 8.2.
Step 2: Download RedSn0w 0.7.2 (or download here), Bootloader 3.9, Bootloader 4.6 and iPhone 2G 3.0 firmware. Save them all in the same folder. Extract/unzip Redsn0w. Make sure you have all the files in place before continue.
Step 3: Just connect your iPhone to your computer via USB cable and launch iTunes. Select your iPhone in iTunes. You might see all information about you iPhone and the button “Upgrade” and “Restore” appear in iTunes window.

Step 4: Hold the “SHIFT” key and click the “Restore” button simultaneously. The iTunes file dialog will pop up for you to select the firmware file. Locate the “iPhone1,1_3.0_7A341_Restore.ipsw” that you have downloaded in previous step and click “Open”.
 Step 5: iTunes will then restore your iPhone with firmware 3.0 automatically. Keep your iPhone connected, don’t touch anything and wait until the process complete.

Unlock & Jailbreak using RedSn0w
Step 6: Your iPhone should completely restore to firmware 3.0. But it’s still locked right now. Please power off your iPhone (but keep it connected with USB cable).

 Step 8: You are required to provide the firmware 3.0 IPSW file. Click “Browse” button to locate the “iPhone1,1_3.0_7A341_Restore.ipsw” were you had downloaded in Step 2.
 Redsn0w will then verify the firmware file. If it’s correct, redsn0w will show the message “IPSW successfully identified”. Then click “Next” button to continue.
 Step 9: You are required to configure the settings for RedSn0w. Normally, you could mark all checkboxes (i.e. Install Cydia, Install Icy & Unlock). If you would like not to install icy, just left “Install Icy” unmarked. Click "Next" button to proceed.
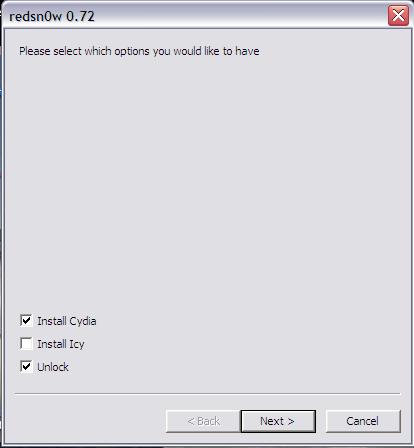 Step 10: Locate the bootloader 3.9 and 4.6 files that you have downloaded at Step 2 by clicking “Browse” button. Then click "Next" button to proceed.
 Step 11: Redsn0w will instruct you to put your iPhone into DFU mode. Ensure your iPhone is connected (via USB) and it’s turned OFF. If you’re ready, click “Next” to continue.
 Step 12: Redsn0w automatically puts the iPhone into DFU mode. After that, you’ll be instructed to hold the "Power" button for 3 seconds. Then hold "Power" and "Home" buttons together for 10 seconds. Next, release "Power" button and continue to hold "Home" button for 30 seconds until your iPhone is in DFU mode.
 Note: Timing is very important here, if you may not be able to put the iPhone into DFU mode for the first trial. Don’t worry. Simply click the “Back” button to go back and try to follow the instructions again. Redsn0w will start the jailbreak process only if it detects your iPhone is properly put into DFU mode.
Step 13: If you have successfully put the iPhone into DFU mode, redsn0w will automatically start the jailbreak process.

Step 14: During unlocking & jailbreaking process, your iPhone screen shows downloading jailbreak data and flashing NOR progress. What you have to do just keep waiting and don’t touch anything to your iPhone.


Step 15: RedSn0w will let you know the jailbreak process is successful. Your iPhone will be restarted and automatically launch BootNeuter to perform unlock. This process will take 3-5 minutes to complete. Just wait until the process been done and your iPhone will be rebooted again.

Step 16: Now unlocking & jailbreaking process has complete with iPhone 3.0 OS. Finally, sync back your iPhone to restore your backups data with iTunes 8.2.

Step 17: For beginner user, you might be want to know what to do after Jailbreak. Check out my post here on how to use Cydia. For those who already knew about the Cydia you could ignore this step.


No comment for "Guide To Jailbreak And Unlock iPhone 2G For 3.0 Firmware using RedSn0w (Windows)"
Post a Comment