Showing posts with label iTunes account. Show all posts

Transfer iPhone Apps Between Computers Using iTunes (Home Sharing)

Let’s say you have purchased an iPhone app via iTunes on your desktop. How do you transfer it to your laptop? Since the release of iTunes 9 in September 2009, Apple introduced a new feature in iTunes called Home Sharing. It allows multiple computers (up to five) in the same local network to copy and share music, movies, apps and other media between computers.

It’s not a hidden feature. But even Apple has updated the iTunes to version 10, not every user have tried it. Here I’ll walk you through this fantastic feature and show you how you can transfer apps between computers easily. In the walkthrough guide, I’ll show you how to transfer the apps from desktop to your laptop so you keep the app library in both desktop and laptop in-sync.

NOTE: Before we start, make sure you have the following three things:

  • Both computers are installed with iTunes 9 or later.
  • You already have an Apple ID associated with an iTunes or App Store Account.
  • Both computers are connected to the same local network either via Ethernet or WiFi.

Enabling Home Sharing on Your Desktop

1. First, open iTunes on your desktop.

2. Click “Advance” and select “Turn On Home Sharing”.

3. Select the Home Sharing icon on the left-hand side of iTunes

4. You’ll be prompted to provide your iTunes account. Simply enter your iTunes or App Store account name and password.

5. Click “Create Home Share” to enable home sharing and then click “Done” to complete the registration.

Enable Home Sharing on Your Laptop

1. On your laptop, launch iTunes.

2. Go over the above 5 steps again to enable Home Sharing on your laptop. Make sure you use the same iTunes account to login Home Sharing.

3. For the first-time setup, you’ll be prompted with message “Home Sharing could not be activated because this computer is authorized for the account. Would you like to authorize now?“. Simply click “Yes” to confirm. iTunes will then show you a message telling you that the authorization is successful.


Transfer Apps from One Computer to Another

If you successfully complete the above procedures, you should now be able to access the desktop’s iTunes library from your laptop computer.

1. Just click the Home Share to connect to under Shared on the left-hand side of iTunes.
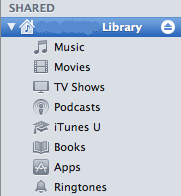
2. Select the “Apps” folder and pick the app you want to transfer. Say, let’s transfer the Cut the Rope app. Just click on it and drag it to your own library to transfer the app.

Obviously you’re not limited to transfer apps from other computers. You’re allowed to transfer other media such as music, movie, TV shows, etc.

Automatically Transfer Apps Between Computers

The above procedures let you transfer app (or other iTunes content) manually. iTunes actually offers an option for you to transfer these content in an automatic way. To enable automatic transfer,

1. Just select “Home Sharing” library and select “Settings”.

2. Select the content for automatic transfer.

In case you want to turn off “Home Sharing” after the app transfer, just click “Advanced” and select “Turn Off Home Sharing”. Enjoy

You have read this article Free iTunes account / iPad Tips / iPhone Tips / iPhone Tips and Tricks / iPhone/IPod Touch / iTunes account with the title iTunes account. You can bookmark this page URL https://fivesatellites.blogspot.com/2011/02/transfer-iphone-apps-between-computers.html. Thanks!

Apple Releases iTunes 9.0.2 And Support for Apple TV

Apple has released an update for iTunes and brings the version number to 9.0.2. The new version adds support for Apple TV software v3.0 and adds an option for a dark background for Grid View. Many of you may concern about the upgrade of iTunes 9.0.2. Will it break jailbroken iPhone? Base on the test, it won’t work with jailbroken and unlocked iPhone. You can still sync your iPhone with iTunes 9.0.2. It’s pretty safe to upgrade to this latest version. To download the iTunes 9.0.2, you can check out Apple’s iTunes website.

Other than that, it also comes with many new features and improvements:

  • An improved look and feel, including a new Column Browser for easily browsing your artists or albums, movies, TV shows, and more.
  • iTunes Store has a brand new look, with improved navigation for quick and easy exploration.
  • iTunes LP and iTunes Extras create unique experiences that feature exclusive interviews, videos, photos, and more — available with select album and movie purchases on the iTunes Store.
  • Home Sharing helps you manage your family’s iTunes collection between computers in your home. iTunes can automatically transfer new purchases, or you can choose just the items you want.
  • Genius Mixes are created for you by iTunes and play songs from your library that go great together.
  • iPod and iPhone syncing now allows you to organize your iPhone and iPod touch home screens directly in iTunes. Syncing is now also more flexible, allowing you to sync individual artists, genres, or TV show and Podcast episodes.
  • iTunes U items are now organized into their own section in your iTunes library.
  • Sync with iPod Nano (5th generation), iPod classic (Fall 2009), and iPod touch (Fall 2009).

You have read this article Apple iPhone News / iPhone News / iPhone Tips / iPhone/IPod Touch / iTunes account with the title iTunes account. You can bookmark this page URL https://fivesatellites.blogspot.com/2009/11/apple-releases-itunes-902-and-support.html. Thanks!

TroubleShooting & Fixes: iPhone Stuck On Apple Logo

Sometimes when jailbreaking an iPhone or after installing a jailbreak app, your iPhone will get stuck on reboot, or will hang on the Apple logo. This problem happened to me before and it was kind of a nightmare. In order to get your iPhone back on track, you will have to put it in DFU mode (Device Firmware Update mode). This will help you restore your iPhone without loading the OS first.

Putting you iPhone into DFU mode should be used as a last resort if your iPhone is either stuck on the Apple logo or keeps rebooting.

1. Connect your iPhone to iTunes.

2. Hold the Home button and the Power button at the same time for 10 seconds.

3. After exactly 10 seconds, release the Power button but keep holding the Home button for 10 seconds or until iTunes pops up a message saying that it has detected an iPhone in recovery mode. At this point, click OK, then click “Restore” in iTunes.

Note that it often takes several attempts to get your iPhone in DFU mode.

Check out this video for a detailed explanation.


You have read this article Apple iPhone News / Create free iTunes account / iPhone Dev-Team / iPhone OS 3.0 / iPhone Tips / iPhone Tips and Tricks / iTunes account / Jailbreak iPhone with the title iTunes account. You can bookmark this page URL https://fivesatellites.blogspot.com/2009/09/troubleshooting-fixes-iphone-stuck-on.html. Thanks!

How To Transfer Custom Ringtone (m4r) File To iPhone (Transfer File Vol.5)

This is volume 5 of the Transfer Files series. In my previous post, i was covered how to transfer files to PC for volume 1, volume 2, volume 3 and volume 4. You may consider to save the custom /downloaded ringtone (m4r) file into iPhone. You can check out my post here on how to make ringtone over 30 seconds using iTunes for free.

The easy way to transfer file is using Disk Aid. DiskAid is a freeware that lets you transfer files between iPhone / iPod Touch and PC. With DiskAid you can manually select all or one by one of your favorite ringtone file by copying and transfer it to PC without using iTunes. See more details about DiskAid and download it here.

Step 1: Connect your iPhone to PC using USB cable. Launch Disk Aid and go to bottom left and click "Root Folder". You're required to confirm it, just select "OK" to confirm.


Step 2: The ringtone file that we would like to copy should be save it at /Root/Library/Ringtones directory. Once you're at "Ringtones" directory just click at menu "Copy File To Device". You'll be required to select file that you want to copy. For example, just locate "I Dont Love You.m4r" file where you just saved it at "new folder".


Step 3: Once your complete, you ringtone file is saved in your iPhone. Close your Disk Aid.


Step 4: Just "slide" to unlock your iPhone and Go to "Setting" > "Sounds" > "Ringtone" to check your ringtone. You should see a new favorite ringtone just added into your "Standard" ringtone section.


You have read this article iPhone Apps / iPhone Tips and Tricks / iPhone/IPod Touch / iTunes account / Jailbreak iPhone Apps / Jailbreak iPhone with the title iTunes account. You can bookmark this page URL https://fivesatellites.blogspot.com/2009/04/how-to-transfer-custom-ringtone-m4r.html. Thanks!

How To Make Free Ringtone Over 30 Seconds Using iTunes (Windows)

Actually you can create iPhone ringtone with full length of song (over 30 seconds) using iTunes. Please be aware that these instruction is base on the iTunes 8.0.2. I never try it out with the latest iTunes (8.1 version). You can try these same instruction on iTunes 8.1 and see if it works or not. However these instruction is works with both jailbroken and unjailbroken (original) iPhone and iPod Touch. If you interested to create ringtone only for 30 seconds using iRinger you may read my post here.

Step 1: Launch your iTunes 8.0.2 and select your favourite songs. For Example i'm already select "I Don't Love You" songs.


Step 2: Right click on the desired songs and the dialog box will pop up on the screen. Select "Create ACC Version" and wait for a while for your iTunes convert it to ACC file format. Once complete you will see the second songs with the same title and info but different file format. (Second Picture). Please note that the original songs is in the MP3 format. You have to convert it first to ACC format. If your songs is already in ACC format you don't need to convert it again. Just proceed to the next step.


Step 3: Right click on the second songs which is in the ACC format. The dialog box will pop up and select "Get Info" for information of this songs.


Step 4
: The dialog box will pop up and shows all the information about this songs. Look out at the bottom of the dialog box info. You should note the info about "Where:C:\Document&Settings\hp\My Documents\My Music\iTunes\iTunes Music\My Chemical Romance\Unkown Album\I Dont Love You.m4a". Find and locate this "I Dont Love You.m4a" file follow by directory above.


Step 5: Before your rename it. You have to do some setting on your windows. Go to menu on your top left and select "Tools" and select "Folder Options" and select "View". Go to "Hide extensions for known files types" option and make sure it an unmarked/unchecked condition. This setup is to ensure that you'll be able to rename or change the name of file extension. If this option is already been setup, ignore this step and proceed to the next step.


Step 6: Create a "new folder" and rename it and put it on your desktop. Copy the located file name "I Dont Love You.m4a" and save it into your "new folder" on desktop. Right click on the file name "I Dont Love You.m4a" and dialog box will pop up and select "Rename". Just rename/change the file extension to .m4r and click "Yes" if you're required to confirm it. Once complete, you'll see the icon is change and the file name is become like "I Dont Love You.m4r"


Transfer .m4r file to iPhone Using Disk Aid

Please take a note that you can't be able sync your new ringtone and installed it to your iPhone via iTunes. However transfer ringtone file using Disk Aid is pretty easy. DiskAid is a freeware that lets you transfer files between iPhone / iPod Touch and computer and enables your iPhone as USB thumb drive or external HardDisk. DiskAid is free to download. You can download it directly from here. You can checkout my post here for further details about Disk Aid.

Step 6: Connect your iPhone to PC using USB cable. Launch Disk Aid and go to bottom left and click "Root Folder". You're required to confirm it, just select "OK" to confirm.


Step 7: The ringtone file that we would like to copy should be save it at /Root/Library/Ringtones directory. Once you're at "Ringtones" directory just click at menu "Copy File To Device". You'll be required to select file that you want to copy, just locate "I Dont Love You.m4r" file where you just saved it at "new folder".


Step 8: Once your complete, you ringtone file is saved in your iPhone. Close your Disk Aid.

Step 9: Just "slide" to unlock your iPhone and Go to "Setting" > "Sounds" > "Ringtone" to check your ringtone. You should see a new favorite ringtone just added into your "Standard" ringtone section.


You have read this article iPhone Tips / iPhone Tips and Tricks / iPhone/IPod Touch / iTunes account / Jailbreak iPhone Apps / Jailbreak iPhone with the title iTunes account. You can bookmark this page URL https://fivesatellites.blogspot.com/2009/04/how-to-make-free-ringtone-over-30.html. Thanks!

Create Free iTunes Account For Another Country Without Redemption Code


In order to download Apps at iTunes you must only have one account on iTunes for one country. But iTunes requires a credit card to validate your registration. Its is quite annoying things for those who want create account on iTunes but don't have any credit cards. Why not we have at least two or more iTunes account!.

As an iPhone user, I'm also have a problem to download free app which does not available in my country. For example, I would like to download Google Earth application, unfortunately Google Earth application does not available in my country. I have to access App Store in United States by creating another iTunes account to get Google Earth apps. By following my guide below you can create more than one iTunes account. Also you can access you account anywhere over the country.

These instruction will guide you on how to create free iTunes account for another country without redemption code.


Step 1: Launch iTunes Store, scroll down and go to the bottom of the iTunes page and press on the “Flag icon”.


Step 2: Now a page with all available iTunes Stores show up, select your country. If your country is not listed, then you should select another country preferably United States. You also can choose another country for which country do you want to access.


Step 3: Now the front page of iTunes Store should loads up, click the one of the free app from the “Top Free App” section [It is on the bottom right of the page]. For example, i'm looking for Google Earth Application, click "TOP Free App" and get Google Earth icon.


Step 4: When the App Page load, press the “GET APP” Button for Google Earth.


Step 5: The login prompt window will pop up, You need to click on “Create New Account”


Step 6: A welcome screen will appear, then you need to click “Continue”.


Step 7: Then a ‘Terms & Conditions’ page will load up, then tick the “I Accept” box after reading it and again press “Continue” button.


Step 8: Enter your details, you need a real and valid email address, its recommended to you create the second email special for this account for future access. For example i'm also use the first email address for iTunes account at my country and second email for another country. Click “Continue” to proceed.


Step 9: This is the important part, If you have followed all the six steps, in the next page, where you should enter your details, you should select “None” option as a payment method. "None" for payment method mean you can buy/get free application only. iTunes will ask your later about payment method if you buy "paid application" for future access.


Step 10: Now you need to fill in your details as screenshot above, if you don’t live in the country you choose, just make up with fake name, address, city, state, zip code and phone number. You may use online "Fake Name Generator" to fill in your fake details, or just go to YellowPages website and find your preferred advert and take its address. Then again click “Continue”.

Step 11: Now you will see a message to click on the confirmation link that was sent to the email you entered earlier.

Step 12: Check your email inbox or Junk Mail, open the email that Apple sent you and click on the confirmation link.

Step 13: When you press the link, automatically iTunes will show up, telling you to enter your brand new iTunes account Details.

Step 14: If you have done everything Okay, you will be greeted with a congratulations page.


Step 15: Now you are done, You can download free apps and access another country, the weekly free song and some free HDTV Tv Shows, without any redemption codes or nothing .. :)


You have read this article Access two or more country with free iTunes account / Create free iTunes account / Free iTunes account / free iTunes account without redemption code / iTunes account with the title iTunes account. You can bookmark this page URL https://fivesatellites.blogspot.com/2008/12/create-free-itunes-account-for-another.html. Thanks!