Showing posts with label iOS 4. Show all posts

Guide To Jailbreak iOS 4.3.1 for iPhone 4, 3GS and iPad1 using Redsn0w (Windows/Mac)

The Dev-Team has also updated PwnageTool for Mac to jailbreak iOS 4.3.1 but Redsn0w is not only available to both Windows and Mac users but also offers a faster jailbreak process since it does not require any custom IPSW to be created.

Note: Please read through the below notes before taking action to jailbreak your iPhone


The jailbroken only compatible as listed below using this tool.
  • iPhone3GS
  • iPhone4 (GSM)
  • iPod touch 3G
  • iPod touch 4G
  • iPad1
  • AppleTV 2G (PwnageTool only for now)
  • If your iPhone is not factory unlocked and you use Ultrasn0w on your iPhone 4 or iPhone 3GS then please note that Ultrasn0w does not work with iOS 4.3.1 at the moment. The Dev-Team will be releasing an updated Ultrasn0w in Cydia soon.
  • You must not update your iPhone with stock firmware from Apple. In order to preserve the iPhone baseband, upgrade to iOS 4.3.1 using custom IPSW created in PwnageTool or by using TinyUmbrella only.
1. You must first download Redsn0w and the iOS 4.3.1 firmware in order to proceed with the jailbreak. Here are the links:

redsn0w 0.9.6rc9:


iOS 4.3.1 Official Firmware

2. Launch iTunes and connect your iPhone using the dock connector to USB cable. Now press Alt key on your Mac’s keyboard and click on Check for update. Windows users need to press the Shift key and then click on update. Since, RedSn0w does not create any custom IPSW you need to update your iPhone to iOS 4.3.1 before performing the jailbreak.

3. You can now select the IPSW file downloaded in the previous step to update your iPhone. In less than ten minutes, your iPhone will update and reboot.

4. Extract the RedSn0w zip archive we downloaded earlier and launch redsn0w.


5. Now click on Browse and select the IPSW file corresponding to your iPhone or other iOS device that you are jailbreaking.


6. RedSn0w will now try to identify and process the firmware file automatically. Once the firmware file has been identified click on Next. RedSn0w will now start preparing jailbreak data based on the IPSW file.


7. By default the checkbox beside Install Cydia should be selected. You do not need to change any settings here. Click Next to proceed.


8. You need to turn off your iPhone or iPod Touch after connecting it to the computer. Click on Next again. The next screen will show you instructions to put the iOS device into DFU mode.


9. You need to hold and release the iPhone buttons in the said order to place it in DFU mode in order to proceed with the iPhone jailbreak. This is the last step for the user as after this RedSn0w will do everything automatically.


10. The iPhone will be jailbroken and then rebooted.


11. Click on Finish when you see Done! on your screen.


12. Now jailbreaking process has complete with iPhone 4.3.1 iOS. Finally, sync back your iPhone to restore your backups data with iTunes.

13. For beginner user, you might be want to know what to do after Jailbreak. Check out my post here on how to use Cydia. For those who already knew about Cydia you could ignore this step.
You have read this article iOS 4 / iPhone Dev-Team / iPhone/IPod Touch / Jailbreak iPhone with the title iOS 4. You can bookmark this page URL https://fivesatellites.blogspot.com/2011/04/guide-to-jailbreak-ios-431-for-iphone-4.html. Thanks!

How To Setting Personal Hotspot On iPhone 4 (iOS 4.3)

This guide will show you how to activate personal hotspot on your iPhone and share it with your wireless devices. To use personal Hotspot for the first time:

1. Go to Settings > General > Network > Personal Hotspot. This option will be available only if your network provider allows Internet tethering. If it worked before on previous versions of iOS, hotspot will work just fine.

2. Turn on Personal Hotspot by tapping once on the On/Off button. You will be prompted to enter a wi-fi password.

3. After entering the password hit Done. Next you will be asked how do you want to share the internet access. If the Wi-fi or Bluetooth radio are Off they will be turned on automatically.

4. Go ahead and choose Wi-fi and USB only. Your iPhone is now broadcasting a wi-fi network with the password you selected and the name of the network is same as that of your iPhone.

5. Now go to any wireless device like your iPod Touch or laptop and look for networks. My Mac was pretty quick to discover it.

6. The broadcast strength seemed strong enough. No matter where the iPhone was left in the room, the signal showed up pretty strong. Once connected, the iPhone will display a blue status bar(just like earlier with Internet Tethering) showing how many devices are connected.

7. If you keenly observe the hotspot service while using it, you will notice that it automatically shuts itself off after an hour approximately if not used. We do realize that wi-fi hotspots are power hungry and don’t go easy on our batteries. In order to make the hotspot active again just visit the Personal Hotspot pane which is now on the first page of your Settings app.

8. While the mobile hotspot is on over wi-fi, the iPhone can’t connect to other wi-fi networks. If you need to connect to other networks on the iPhone but leave the hotspot on go to Settings > Wi-fi and tap on Disconnect wi-fi clients.

In case you aren’t on a 3G network the hotspot will obviously stop when you make or receive a phone call. However, once the call is over everything resumes just like the call never took place.


You have read this article iOS 4 / iPad Apps / iPhone 4 / iPhone Apps / iPhone Tips / iPhone Tips and Tricks / iPhone/IPod Touch / Jailbreak iPhone Apps / Jailbreak iPad Apps with the title iOS 4. You can bookmark this page URL https://fivesatellites.blogspot.com/2011/03/how-to-setting-personal-hotspot-on.html. Thanks!

Create and Edit Video Like iMovie Using Splice Video

Splice comes as a huge convenience for video editors and those who simply love to post videos on the Internet. The iPhone application is rigged with a wide variety of features, allowing you to tinker with a video in every which way possible. You can adjust the sequencing, scoring, add effects and pretty much all of the basic stuff that a video editing program offers. Best of all, your edited videos come out in high definition.

Professional video editors will look for more advanced features, like a comprehensive set of options for displaying text, but they won’t be disappointed with Splice’s capabilities. The interface is very simple, as the features are easy to get familiarized with. Professionals won’t have problems creating a masterpiece out of the iPhone application, while novices shouldn’t take long before they can craft interesting material to place on their social networking accounts.

People who have large amounts of songs stashed on their phone will have a blast with Splice. They have a ton of options to choose from for musical scoring. Creative fellows can also make their own scores with a sound making application, and they can sample existent songs just by rifling through the music tracks on their phone.


Splice is priced at a shade below two bucks, and is compatible with the iPhone 4, iPhone 3GS, iPod Touch, and the iPad. The operating system requirement is at least iOS 4.2. You can buy and download it by hitting on this iTunes link.

You have read this article App Store / App Store review / Appstore / AppStore review / iOS 4 / iPhone 4 / iPhone Apps / iPhone/IPod Touch with the title iOS 4. You can bookmark this page URL https://fivesatellites.blogspot.com/2011/02/create-and-edit-video-like-imovie-using.html. Thanks!

How to Install TetherMe 1.3-12 .deb File For Free

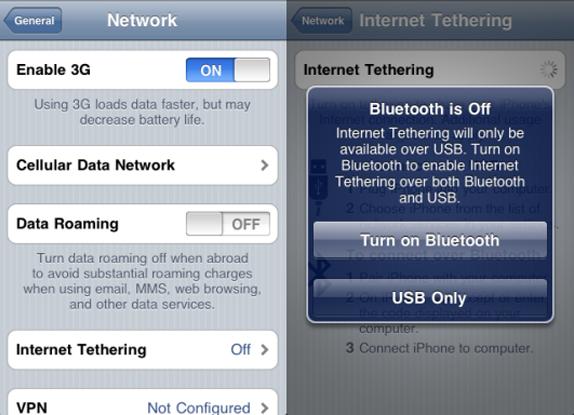
TetherMe has been updated to 1.3-12 version which is cracked .deb file and only compatible with iPhone jailbroken. It also support iPhone with iOS 4.0 or up. Dynamically enables native tethering for iOS3.X and iOS4.X+ devices. This should work on any carrier without the need for customized bundles or preferences.

NOTE: You MAY need to reboot your iDevice if upon installation or removal cellular service does not return. There is no icon for this item. After installation or reboot, tethering will be available to turn on in Settings -> General -> Network, or install the Tethering Toggle for SBSettings.


How To Install TetherMe Via Mobile Terminal

  • Download TetherMe.deb file here
  • After downloading the deb file above rename it to tether.deb
  • Copy it to var/mobile on your iphone and install using ifile or do the following
  • Open up mobile terminal
  • Type in su (press return)
  • Type in alpine (press return)(Change your default password due to security reason)
  • Type in dpkg -i tether.deb (press return)
  • Reboot and respring your iphone

Alternate Ways To Install:

Auto Installation

Ssh your iPhone. You may see instruction on how to install .deb file via SSH. And make a folder called AutoInstall in/var/root/Media/Cydia/ so you have /var/root/Media/Cydia/AutoInstall which is case sensitive and drop this debs file in the autoinstall folder, reboot and respring your iPhone.

OR

Auto Installation Using i-FunBox

You may click here for easy way of auto installation using i-FunBox. Just use your USB cable!


You have read this article Cydia Apps / Free Cydia Apps / iOS 4 / iPhone/IPod Touch / Jailbreak iPad / Jailbreak iPhone with the title iOS 4. You can bookmark this page URL https://fivesatellites.blogspot.com/2011/02/how-to-install-tetherme-13-12-deb-file.html. Thanks!

Guide To Jailbreak iOS 4 (For iPhone 4, 3GS, 3G)


The iPhone Dev team has released a browser-based jailbreak tool known as JailbreakMe that is capable to jailbreak all models of iPhone including iPhone 4, 3GS (both old and new bootrom) and 3G running on the latest version of iOS (i.e. 4.0 or 4.0.1). “Jailbreakme” is even simpler and more user-friendly than Spirit. It is so simple that I wonder if I still need to write a guide for it. For those who do not familiar with the jailbreak process, here is the step-by-step guide to show you the process.

Please read this before your take any further action:

  • JailbreakMe should also work with iPhone that has been jailbroken with blackra1n or Spirit. But before using JailbreakMe, please restore the iPhone to iOS 4.0 / 4.01 via iTunes.
  • JailbreakMe will not hacktivate your iPhone. Your iPhone should be activated before using the browser-based jailbreak tool. You can either purchase an official SIM card or simply borrow it from your friend to activate the iPhone.
  • Remember to backup all your iPhone data via iTunes. You can simply connect the iPhone to your computer and sync all the data. This step is crucial. In any case you are stuck in the jailbreak process, you can always restore your iPhone back to the original state.
  • Though JailbreakMe should work with iPhone OS v3.x, this guide is intended for those running iOS 4. So, I suppose you have upgraded to iOS 4.0 / 4.0.1. If not, please upgrade it via iTunes.
Step 1: As JailbreakMe is a browser-based jailbreak tool, no software download is required. All you need to do is to launch the mobile Safari on your iPhone and point it to http;//www.jailbreakme.com. If the above link doesn’t work, you can also try out http;//jailbreakme.modmyi.com
Step 2: Simply slide the “slide to jailbreak” slider to kick off the jailbreak process.


Step 3: The whole jailbreak process will take several minutes to complete. Once done, the tool prompts you that cydia has been added to your iPhone. Its done!..and enjoy!


Step 4: You need to unlock after jailbreaking...for iPhone 4, 3GS and 3G user, if you need to unlock the iPhone, you can launch cydia and install ultrasn0w. You can checkout my guide here how to unlock using Ultrasn0w.


TroubleShooting & Fixes

  • You may be stuck after you kick off the jailbreak process. In that case, you can simply reboot your iPhone and go through the whole process again. Usually, the jailbreak should work normally for the next trial.
  • If you are still stuck at the purple screen after reboot, Here are the procedures:

1. Go to Settings -> Safari and then tap “Clear Cache”. Tap again to confirm the cache clean up.

2. Tap “Clear History” to clean up the browser history

3. Tap “Clear Cookies” to clean up the cookies

4. After you clean up the browser cache/history/cookies, reboot the iPhone

5. Once rebooted, point the mobile Safari to http://jailbreakme.com and try again.. Good Luck!


You have read this article Guide to Jailbreak iPhone 3G / How to jailbreak iPhone 3G / iOS 4 / iPhone 3G S / iPhone 4 / iPhone/IPod Touch / Jailbreak iPhone with the title iOS 4. You can bookmark this page URL https://fivesatellites.blogspot.com/2010/08/guide-to-jailbreak-ios-4-for-iphone-4.html. Thanks!

iPad is Delicious

Apple has started airing a new commercial, iPad is delicious. The commercial pretty much portrays how useful the ipad can be in many many different instances.


You have read this article Apple iPad News / iOS 4 / iPad with the title iOS 4. You can bookmark this page URL https://fivesatellites.blogspot.com/2010/08/ipad-is-delicious.html. Thanks!

iPhone 4 vs iPhone 3GS

For some readers who are currently using the iPhone 3GS, they are still considering the upgrade. One, who is quite new to iPhone, said, what are the difference between iPhone 4 and 3GS? Needless to say, the iPhone 4 is a major upgrade over iPhone 3GS. Apple has published a comparison between these two phones at it website. But below comparison from Mahalo gives a better presentation.


You have read this article Apple iPhone News / iOS 4 / iPhone 4 / iPhone News / iPhone Tips / iPhone/IPod Touch with the title iOS 4. You can bookmark this page URL https://fivesatellites.blogspot.com/2010/08/iphone-4-vs-iphone-3gs.html. Thanks!

Tips: Enable Emoji Icons On iOS 4

Emoji icons are picture characters that are very popular in Japan for text messaging. Nearly all mobile phones in Japan have Emoji icons built-in. Since the release of firmware 2.2 in late 2008, Apple has brought Emoji icons to iPhone. However, it is for iPhone users using Softbank network in Japan only. For those who want to use Emoji icons on iPhone, simply follow the step-by-step procedures:


Step 1: Launch App Store and search for "Emoji Free". Simply install it and its free apps.

Step 2: Once installation is done, launch it and click the “ok, lets do this!” button to proceed.

Step 3: The process only takes a few seconds. After that, your iPhone is allowed to use Emoji icon.

Step 4: Click HOME button to go back to home screen. Tap “Settings” -> “General” -> “Keyboard” -> “International Keyboards” -> “Add New Keyboard…”. Tap on “Emoji”.

Step 5: You should notice a new Emoji keyboard installed after it goes back to the previous screen. You can then launch any iPhone app to try out the feature. To switch between different keyboards, you can tap on the “globe” button. In case it doesn’t work, restart your iPhone and try again.

You have read this article Appstore / iOS 4 / iPhone 4 / iPhone Tips / iPhone Tips and Tricks / iPhone/IPod Touch with the title iOS 4. You can bookmark this page URL https://fivesatellites.blogspot.com/2010/08/tips-enable-emoji-icons-on-ios-4.html. Thanks!